Tips On How To Make A Bun In Medium Hair
Many women today love medium-hair because it provides them with different styling-options and it also offers the perfect length to wear a bun. In fact, medium-hair is not so heavy and not too light and this makes it perfect for several up-do and downward hairstyles. However, in this post I’m going to provide you with some of the best methods of making a bun out of your medium-hair inorder to achieve nice-looks.
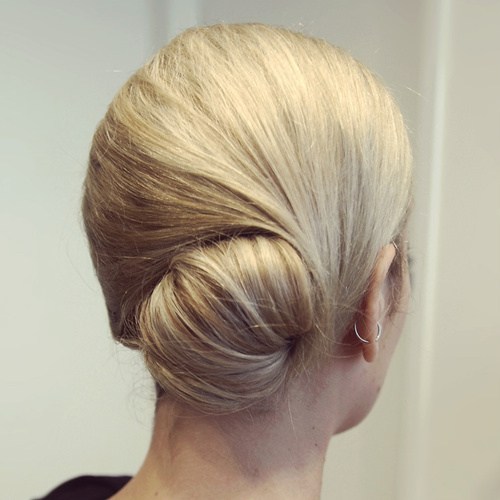
MEHTOD-1: How to make a low Bohemian Bun out of medium-hair:
- Wash, dry-up and comb your hair: before you start styling your hair, you will need to wash it thoroughly using a good conditioning-shampoo and after dry it up gently with a clean towel. When your medium-hair is a bit moist, use a blow-dryer and wide-toothed comb to remove any knots/tangles from it.
- Part hair onto one-side: Bohemian-buns are usually generated with a side-part and this implies that you will need to part your hair to a preferred side or consider creating a deeper part inorder to achieve an elegant-look for a particular event. Afterwards, use a wide-toothed comb to brush through your part inorder to ensure that the hair in that section is completely straight.
- Gather hair where you need the bun to be positioned: a Bohemian-bun looks pretty when positioned at the nape of your neck but you may also position it higher-up if it’s what you prefer. On the other hand, inorder to achieve a wedding-friendly look you will need to do a side-bun but with the bun just resting under the one-ear. So, grab and gather hair where you want the bun to be positioned just before you start styling it.
- Wrap the gathered hair with a hairband: you will now have to wrap a hairband around the gathered hair once inorder to prevent the bun from falling-out after styling it. In fact, it’s recommended to use a tighter hairband because the Bohemian-bun tends to fall-out more easily than other buns.
- Wrap the hairband over the ponytail inorder to create a looped-bun (optional-step): this involves twisting the hairband and then pull it over the ponytail inorder to create a looped-bun but don’t pull hair all the way through. In fact, you should stop pulling hair when about half of the ponytail is still hanging-down inorder to achieve a great looped-bun. Afterwards, check to ensure that the hairband is holding the looped-bun securely and if not then consider taking a second hairband and wrap it tightly around the looped-bun inorder to make it more secure.
- Wrap the tail of hair around the hairband
: you may also consider taking the ends that are still sticking-out and then wrap them around the hairband but upwards against the head. This will help to completely cover the hairband whereby it’s no-longer visible and afterwards secure your hair in place using bobby-pins.
- Finish-up your Bohemian-bun: this involves pulling out a few hair-strands on the either side of the face inorder to achieve a softer look. On the other hand, you may also consider pinning a flower or any other decorative hair-accessory just above the Bohemian-bun and then finish by spraying your styled medium-hair with medium-hold hairspray inorder to keep in place.
METHOD-2: How to make a Braided-bun out of medium-hair:
- Wash, dry and part your hair: clean-up your hair using a good shampoo and conditioner then pat it dry with a towel. Afterwards, decide on where to part your hair but you should know that a braided-bun looks more beautiful with hair parted on one-side or right down the middle if you want to achieve a milkmaid look. So, brush your hair and then run the tips of the comb along the created part inorder to make it look neat and straight.
- Separate the sides of hair from the back-section: the sides of your hair are the only parts that will be braided and the back-section has to be left unbraided. So, gather hair from the temple-area and then drape it over the shoulders. Afterwards, comb-out the hair in the back-section inorder to keep it separate for the hair on the sides. On the other hand, the larger the hair on the side-sections, the larger the braid will become and vice-versa. so, if you want to achieve a small and fine braid then separate about a half-inch of hair from each side but if you want to achieve a thick, milkmaid-style braid then separate about 1-to-2 inches of hair from each side.
- Gather the back-section of hair into a ponytail: grab and gather the back-section of your hair into a ponytail and remember to leave the side-sections out of the way. Afterwards, secure the ponytail where you want the bun to sit and make sure that the hairband is tight-enough inorder to hold your style in place.
- Twist the ponytail around the hairband: after, twist the ponytail around the hairband and then pin the hair-ends in place. In fact, the bun should be able to hide the hairband and also feel secure over your head.
- Braid-up the right-section of your hair: you will have to start braiding near the right-temple and then continue braiding all the way down to the hair-tips.
- Wrap the braid-tail around the base of your bun
: in fact, the braid should lay against the head and pass under the tip your ears until it reaches the created bun. Afterwards, fit the braid-end over the base of the bun and then keep wrapping the braid around until the entire length has been wrapped-up. Consider using bobby-pins to secure the ends of the braid into place.
- Braid-up hair on the left-section: you start braiding hair just next to your left-temple and then continue braiding hair all the way down to the tips.
- Wrap the braid-tail around the bun-base: the left should lay against your head and then pass under the tip of your left-ear until it reaches the created hair-bun. Afterwards, fit the braid-ends over the bun-base and then wrap the braid around the bun until the entire length is wrapped-up and finish by applying bobby-pins to secure the braid-ends into place.
- Spray your braided hairstyle with a good hairspray: you will need to use a firm-holding hairspray all-over your head inorder to prevent the braid from becoming loose.
Categories: How To